Deploy Azure PostgreSQL flexible server with pgvector extension
Easy steps to deploy Azure PostgreSQL flexible server with pgvector extension for vector similarity search.

Using vector storage and search is becoming increasingly popular due to the momentum that Generative AI has gained. It is a critical part of many use cases that require relevant context for prompts, while staying within the token limit of LLMs.
There are many options available for storing vector data and performing searches. Some are provided as third-party hosted APIs, while others can be deployed as containers to Kubernetes clusters. There is also an interesting alternative: using a good old PostgreSQL database with the pgvector extension!
This blog post describes how to set up a PostgreSQL database in Azure and enable the pgVector extension for embeddings. Part I covers the process of:
- creating a PostgreSQL Flexible Server,
- setting up firewall rules
- whitelisting and enabling
pgvectorextension
Prerequisites
Before we start, make sure you have the following prerequisites:
- An active Azure subscription.
- Azure CLI installed on your machine. You can download it from here.
- The rdbms-connect extension for Azure CLI. This extension is used to execute SQL commands against a PostgreSQL server. You can install it using the following command:
az extension add --name rdbms-connect --version 1.0.3
Bicep Template
We will use a Bicep template to define the resources needed for our PostgreSQL server. Bicep is a declarative language for describing and deploying Azure resources. Here is an excerpt from our Bicep template:
resource postgres 'Microsoft.DBforPostgreSQL/flexibleServers@2022-12-01' = {
  name: serverName
  location: location
  sku: {
    name: skuName
    tier: skuTier
  }
  properties: {
    // redacted for brevity
  }
  resource configurations 'configurations@2022-12-01' = {
    name: 'azure.extensions'
    properties: {
      value: 'vector'
      source: 'user-override'
    }
  }
}

resource langchainDB 'Microsoft.DBforPostgreSQL/flexibleServers/databases@2022-12-01' = {
  parent: postgres
  name: 'langchain'
  properties: {
    charset: 'UTF8'
    collation: 'en_US.UTF8'
  }
}
This template defines a PostgreSQL server with the pgvector extension enabled. The server’s properties such as SKU, version, storage, backup, and high availability can be customized according to your requirements.
You can find the full version of the Bicep template in the azure-postgres-vector repository.
Deploying the Bicep Template
Once we have our Bicep template ready, the next step is to deploy it. We will use a PowerShell script to automate the deployment process. Before we run the script, we need to update the parameters for our Bicep template.
Updating the Parameters
The parameters for the Bicep template are stored in a JSON file named postgres.params.json. This file contains the parameters needed for the Bicep template. Here is an example of what the file might look like:
{
  "$schema": "https://schema.management.azure.com/schemas/2019-04-01/deploymentParameters.json#",
  "contentVersion": "1.0.0.0",
  "parameters": {
    "serverName": {
      "value": "your_server"
    },
    "administratorLogin": {
      "value": "your_login"
    },
    "administratorLoginPassword": {
      "value": "your_password"
    },

    // omitted for brevity
  }
}
You need to update the values in this file according to your requirements. For example, you need to replace "your_server", "your_login", and "your_password" with your actual server name, login, and password.
Running the PowerShell Script
After updating the parameters, we can now run the PowerShell script to deploy the Bicep template. The script is named Deploy-Postgres.ps1 and it’s located in the same repository as the Bicep template.
In PowerShell, you can use parameter splatting to pass parameters to a command as a hashtable. This can make your command more readable, especially if it has a lot of parameters. Here is how you can use parameter splatting to run the script:
$params = @{
    SubscriptionId = "your-subscription-id"
    Location = "your-location"
    ResourceGroupName = "your-resource-group-name"
}

.\Deploy-Postgres.ps1 @params
Replace "your-subscription-id", "your-location", and "your-resource-group-name" with your actual Azure subscription ID, location, and resource group name.
The script will create a new resource group in the specified location, deploy the Bicep template to the resource group, and then add your current IP address to the firewall rules of the PostgreSQL server. Here is the code snippet that adds the IP address to the firewall:
# Get current IP address and add it to the firewall
$ip = Invoke-RestMethod http://ipinfo.io/json | Select-Object -ExpandProperty ip
$RuleName = "AllowMyIP_$($ip.Replace('.',''))"
az postgres flexible-server firewall-rule create --resource-group $ResourceGroupName --name $ServerName --rule-name $RuleName --start-ip-address $ip --end-ip-address $ip
The script verifies that the vector extension is enabled on the server. Here is the code snippet that verifies the extension:
# Get the extensions that are on the allow-list for the server
Write-Host "Getting the extensions on the allow-list..."
az postgres flexible-server parameter show --resource-group $ResourceGroupName --server-name $ServerName --name azure.extensions --query '{Name: name, Value: value}'
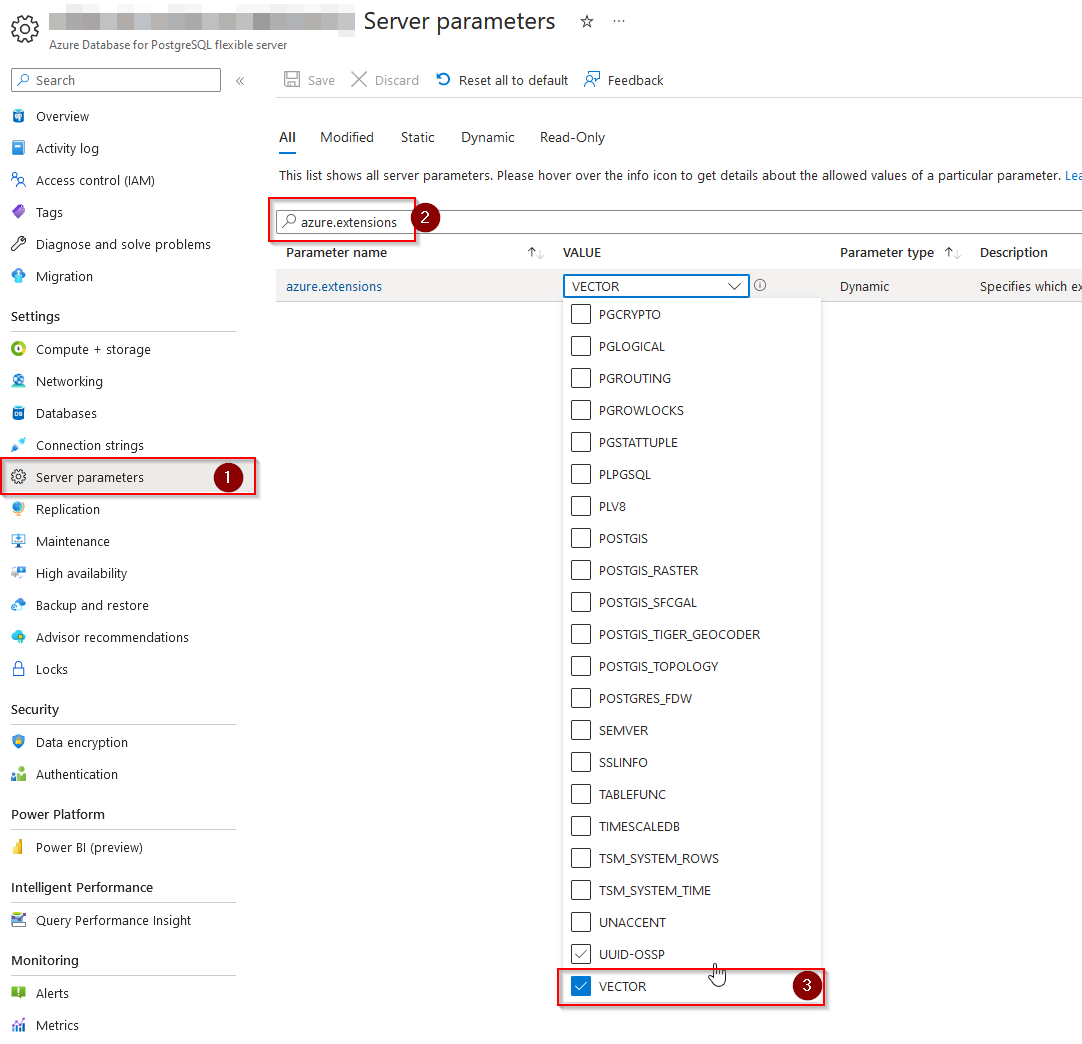
You can also verify this in the Azure portal. Navigate to your database resource in the Azure Portal, and then go to the Server Parameters in the Settings section. Look for the azure.extensions parameters and make sure that the vector checkbox is selected.

Finally, the script will also activate the pgvector extension on the ‘langchain’ database. Here is the code snippet that activates the extension:
# Connect to the server and activate the pgvector extension on 'langchain' database
az postgres flexible-server execute --admin-password $AdminPassword --admin-user $AdminLogin --name $ServerName --database langchain --querytext "CREATE EXTENSION IF NOT EXISTS vector;"
You can find the full version of the PowerShell script in the azure-postgres-vector repository.
Summary
In this blog post, we have created a PostgreSQL Flexible Server instance in Azure and enabled the pgvector extension for it. In the next part, we will create a simple application using LangChain and connect it to the database to store and retrieve embeddings.
Cover photo by Midjorney Bot v5 generarted using following prompt: matrix styled illustration of lots of data stored in numeric format with a lot of decimal places photorealistic